Tuesday, February 11, 2025

Tire Fire Rally - Sports Cars in Traffic


    I'm going to be transparent, I didn't really start this game with any ethos in mind. The original note for the game said “A NASCAR game, but with stupid things on every lap.” But I have a lot of time alone with my thoughts while I'm actually building my stupid idea, and I’ve been going around and around trying to figure out why I wanted to make fun of racing in the first place.

    I’ve been advertising this game as a racing game being made by someone who hates driving, which is mostly true. I hate traffic, car maintenance, insurance, parking, pretending to care about dents and scratches, and of course, car payments. The day to day of owning and using a car is expensive and dull and I despise it, except for one month in 2020.

    That summer, my city was brought to a standstill between COVID, protests, and the presence of the National Guard. I had a job that kept me out a few hours past the curfew and left me driving through a completely deserted city covered in boards and bright protest graffiti with fucking armored Humvees sitting on the overpass. I fucking loved it. I would blast the soundtrack to JSFR and speed through my city at what would have been very dangerous speeds if anyone ever had been out. It is the only time in my life that driving actually felt like the “freedom” all the car companies try to sell it as, and I think that taste of how fun they could actually be made me paradoxically hate cars all the more.

    It really highlighted how we were building these machines with capabilities that had almost nothing to do with how they would be used. Super cars are engineered to handle above 120 mph and bluff emissions detectors only to idle in L.A. traffic for most of their lives. Trucks that can haul multiple tones of steel will move a couch once or twice if they're lucky. SUVs are built like they should be crouched on an overpass enforcing a curfew instead of shuttling kids back and forth. Using my car in the post-apocalyptic, cyberpunk city, it felt like it was a toy instead of an expensive and poor excuse for proper public transit, and I hate that I am paying to keep all these systems that we're designed for speed and agility that I will almost never reach in working order.

    I've also been playing a decent amount of racing games in my little bit of spare time. You know, for “research.” A lot of them treat cars like they're somewhere between religious icons and pornographic. They make them almost deities, which makes me want to act as an iconoclast. I wanted to take these machines that were built for non-existent stretches of open, perfectly maintained highways and race tracks and subject them to the drudgery of traffic, potholes, and toll booths. I think it’s the same instinct that made people tune into The Simple Life to see the disgustingly wealthy working a fast food job.

    That being said, a lot of the original ideas I wanted to throw into the game turned out to be very boring. It’s funny to see a Corvette in traffic, but not fun to be a Corvette in traffic. This is still a game after all. So, a lot of the obstacles got ratcheted up in weirdness. The current mood is a bit like taking fashion models and forcing them to run through a Wipeout course. I think that's close enough to my original notes. I wanted to make fun of the culture of racing and over engineering because it had virtually nothing to do with normal driving, started with frustrating realism, and ended up with something goofy and light hearted.

    If Wipeout with cars sounds cool to you, wish list the game on Steam before the demo comes out.


Saturday, January 25, 2025

Tire Fire Rally - Flat Crowds


    I've been thinking recently (for obvious reasons) about a conversion I had with a friend almost 15 years ago about crowds in racing games. I can’t remember the games, but he was lecturing me about one of them being worse because the horrible, lazy developers just used 2D sprites to fill the crowd instead of making fully modeled people. At the time, I think I came down firmly on the side of “don't care.”


    There are so many little pieces of a game that players barely see for a frame or two, like the Halo 3 rat, that still need to be there, but just barely. It's not like the player is going to be chatting to the crowd. It's not The Sims of Fable. You will not marry any of these people (Don't look at the top right). So, after more than a decade I am agreeing with my idiot, teenage self again. These 2D, repetitive bastards are staying in the game, maybe getting some friends.

    The other side of my laziness is just the weird charm I feel from these older, much more jank games. I am still trying to figure out what it is, but I can't get over the trees, the ridiculous 2D bill-boarding trees in these old games. They're fantastic in a way that almost no properly modeled, high poly, shaded out trees are. It reminds me of the jump in video quality from film to digital when the technology first came out. Digital eventually caught up in quality, but the immediate jump was worse.

    There was a whole generation of developers who painstakingly drew out these pixely little trees. They mastered making these things look as beautiful and inviting as possible given the technological limitations. We jumped from these (Pictured right) to the Halo 1 Blood Gulch tree that had about six polygons, and while the trees in RDR2 and Battlefield 1 are not light years ahead of these palms, I still do love them.

    Thanks for reading my ramblings about 2D trees and copy/paste crowds. If you're interested in not seeing these people as you whip by, you can wishlist Tire Fire Rally here.

Wednesday, January 22, 2025

Micro Tutorial: Signals with Custom Events


    Custom Events are very important to my projects allowing all sorts of different triggers and scripts from all over the game to communicate specific information. So, I thought I'd go over quickly how they work.

    That red box in the first picture is just a trigger and tag comparison to make sure this script only fires when it is hit by the player. You can read more about that in a previous tutorial, then a cooldown to make sure the script doesn't fire multiple times when the player is entering the trigger once, but that's beside the point of this post. The last block is the important one here, the Custom Event - Trigger block. 

    I made this script to be flexible, as in applied to multiple triggers that will all need to send different messages to different places, which is why all the important information is in Object Variables. Being object specific, I can change the message and destination for each one without altering the original script. The message the trigger is supposed to send is connected with that orange line, and the destination where it is supposed to be sent it connected with the green line.


     In this second picture, you can see the Object Variables in the green box. So, we're sending the message "JokeTrigger" to the the target "DungeonKeeper" which is my scene manager. 

    The blue box is the receiving portion of the script in DungeonKeeper. Custom Event - Arguments is listening for a specific phrase, in this case "JokeTrigger" to be sent to it, and it will only fire the script when it receives this message. Throwing it all together, when the player hits a certain mark, a random joke is told, and with the use of Custom Events, we can have lots of those marks all around the scene all sending messages back to the main controller.

     Thanks for reading. This script-bit is pulled from Tire Fire Rally. If you want to see more, go add the game to your wishlist. Either way, come back later for more jank script tutorials.


Buy Me a Coffee at ko-fi.com

Sunday, January 19, 2025

Tire Fire Rally - Announcement

     This is going to be a new type of post for this page, an actual dev-blog entry instead of just tutorials. I said in the bio that I sometimes make games, and now I have to make good on that.

    I'm now working on a stupid rally-racer called Tire Fire Rally, and thanks to a grant from Mangotronics, it's coming to Steam. (These will probably get more polished and focused as time goes on, but I wanted to share this and I'm inpatient.) I've mentioned in some of my tutorial posts that you can support this blog by buying my last game, but if you're looking for a cheaper way to show support, you can go wishlist this game and start spreading it around.

    This game exists for two reasons; I got the game Corvette free with my original Xbox and I used to play a game called drunk driving in college with Mario Kart where you had to finish your drink by the end of the race, but couldn't drink and drive at the same time. After a race or two, all the karts started to get a bit sloppy on the corners.

    With Tire Fire Rally, I'm hoping to combine Corvette and Drunk Driving, having a game that at first presents itself as a serious (but retro) racing game and devolves into the ridiculousness of kart racing mechanics and drunk college kids. I want the other cars to drive like idiots, the announcer to be at least six drinks in, the sponsors to be scams, and the tracks to be designed with negligence.

    I hope that you'll all come back in the future to read more (and better articles) about a racing game with toll booths, but if not, you can still always wishlist the game (and start opening that page on all the model computers at Best Buy) and forget about it until launch. And if you're here for tutorials and mad that there's a half-assed blog on the front page, I promise I'll have more for you soon.
    Later.


Top Down Tank Tutorial: Health and Death


    I think this is the last piece of the code for the tank, all taking damage, gaining health, and dying. Let's get to it.


     The tank has two main colliders, one regular physical collider with a rigid body, and then one slightly larger set as a trigger zone. Things that can hurt the tank like bullets, explosions, enemy shells, all have their own assigned tags. When they cross into the tanks trigger zone, that first bit of script in front of the "If" function is checking the tag to trigger the according health loss. One thing I always forget, and it takes a very long time to debug if you're sleep deprived, the Collider from the On Trigger block needs to be hooked up to the Compare Tag block with that elusive green line.

    After the compare/if bit, you can see the Get Variable block pull the tanks current health, subtract the Enemy_Bullet_Damage, and then it feeds that up to a set variable block to update the tanks health.


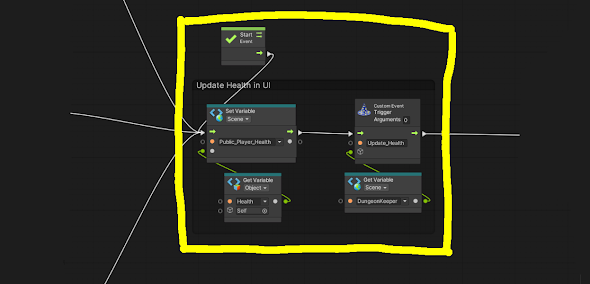
     The next bit is updating the players health in the UI. This bit is also called On Start (top block) so that the UI shows the players health as full. When the player takes damage, this bit updates the Public_Player_Health and then sends a message (Custom Event) to the scene controller (Dungeon Keeper) telling it to set the UI health to be the same as the Public_Player_Health.


    This next block I call "popping" the UI, which I go over more thoroughly here. Basically changing the color and size of the UI element just for a moment so the player actually notices something has updated.

    This last bit, since Top Down Tank is but a simple game, checks if the players health is less than or equal to zero, and then sends the player to a scene that just says "You Died" if the math checks out. So, now that we have covered losing health and death, I'll show you the whole script and then we'll move to gaining health.

    Crash course, the crate in the ruins in the cover image is a health pick up. It has a trigger with a check looking for collision with the player character. When it gets that hit, it sends a message to the dungeon keeper and the player to update their health records, and here's how it goes.


    The first block is a Custom Event waiting to receive the message "Health40" from a crushed crate. Now comes the tricky part. We don't want the player to raise their health past the tanks maximum, so we first have a check to see if the players health is at least (Less or Equal) 40 points less than full. This game (unfortunately for me) let's the player select from a number of different tanks with different levels of health, all of which are stored in a list called T6_UpgradeList (Get Variable) from which we are pulling the first slot (List - Get Item - 0) because this tank is not upgrades. If they had two health upgrades, we'd be pulling from Index: 1.

    Once we have the health, we subtract the potential health boost (40) and then check if the player has taken at least 40 points of damage. If yes, we just go ahead and add (Set Variable - Add) the 40 points back to the players health.

    If the players health is less than 40 points from being full, we just go back to the upgrade/health list, pull the maximum recorded health, and set the player back to full. This sounds annoying and fiddly, but it's very easy to slip up and allow the players health to grow forever line they're the blob.

     Anyway, thanks for reading. Maybe next I'll go more in-depth about how pick ups work. If this is helping, maybe throw me something on Ko-Fi, or buy a Kaiju game. I'll probably keep making these either way.

    Stay fresh, cheese bags.


Buy Me a Coffee at ko-fi.com

Saturday, January 4, 2025

Top Down Tank Tutorial: Mouse Tracking


    Now for a very important piece of the top down tank, the jank way I make the turret track the players mouse. We'll start from the simple bits and get more fiddly from there.

    I think I've mentioned this method before in the NPC Turret Tutorial, but we'll go back through anyway. There is an empty object attached to the tank called the Sight. It's only job in the world is to look to where the mouse beacon (Mouse_Sight) is in the world at any given time so the turret can get the coordinates. So, On Update -> Look At: Variable - Mouse_Sight. All simple and good.

    Just like the sight, we're having this chunk of script fire every update because we want the turret pointing constantly at the players mouse. We're grabbing the rotation (Get Rotation) from the mouse sight from the panel just above (Object Variable: Sight) and then taking only the Y and W coordinates from that rotation data. The turret in this game is essentially 2D and stuck on the Y axis. No need for Z and X.

    We're taking the Y and W to create a new, more basic rotation and then forcing the tank turret (Set Rotation) to adopt that rotation. Still pretty simple.


     So, with this we are essentially treating the view as a 2D image, getting the position of the mouse on the screen, and the projecting that (Physics - Raycast) down until it hits something (Raycast Hit - Get Point). There is an invisible object in the game we mentioned earlier called the Mouse_Sight that this script is attached to and this script is constantly moving the object to where it thinks the mouse should be landing in the scene so the turret can track it. It's sort of a pain in the ass.


     Last an most important bit, you need to set the Field of View in your camera to 20 or higher. The higher that number, the broader the plane from which your mouse can project and the more accurate the mouse tracking will be. It is lower than 20 by default. So, make sure to fix that.

     That's it for now. I'll try to have what I expect to be the last part up next week. If this is helping, maybe throw me something on Ko-Fi, or buy a Kaiju game. I'll probably keep making these either way.


Buy Me a Coffee at ko-fi.com

Saturday, December 28, 2024

Top Down Tank Tutorial: Firing


    Now for a very important bit if you're making a tank, firing.


    Firing, as you might have guessed, is tied to the left mouse click, which according to Unity is Mouse 0. Right after the On Keyboard Input block, we're going to a Cooldown set to 0.5 seconds. So, the player can only fire a shell every 0.5 seconds at the most. In other games, I've implemented an ammo counter and I would also have a check after the cool down to see if ammo is greater than zero, but this is a nice simple tank game. Just a cooldown for this one.


     The Get Variable block is here to orient the shell. The tank has an invisible little object attached to the barrel of the tank just beyond the box collider so the shell doesn't collide with the tank and explode right at spawn. This spot is the BulletPoint. We've attached the Variable Block to a Get Forward block so the shell knows which and then multiplying the forward force by 3 all across the board. So, Get Forward multiplied by a Vector 3 with all slots set to "3."


    Now we're finally spawning our shell into the world with an Instantiate block. The Original slot is tied to a prefab of the tank shell. You can see a Get Position and Get Rotation block on the left side feeding into the Instantiate block. Those two are tied back to the Get Variable: BulletPoint block from the last slide. So, the shell spawns in at the Bullet Point and facing the right direction, which is away from the tank.

    Then we finally move onto the Add Force block to get this shell moving. The little green line between the Instantiate and Add Force is hooked up the denote the force is being applied to the rigidbody of the newly created object. (Note: Your ammo will need a rigidbody if you want this to work. Play with the mass. It can be fun) The force Mode is set to Impulse because I wanted this to mimic a firing round and lose momentum after a bit, and the Force input comes from the Multiply block in the last slide.

    So all the blue square was us figuring out what direction to push and how hard to push it, and then we dump all that information into the Add Force block to actually execute it.


    Also I have this bit because I wanted the tank to make noise when it fires. The position is also set to the BulletPoint. And just below this is a zoom shot of everything so you can reference how it all hangs together.

     That's it for now. Come back soon to learn more about how this tank works. Maybe throw me something on Ko-Fi and I can justify making some more Visual Script write ups, or buy a game. I have a lot of other half-baked scripts to share.


Buy Me a Coffee at ko-fi.com